Table of Contents
Control valves are crucial components in various industrial processes, as they help regulate the flow of fluids or gases. However, over time, control valves can develop issues, such as sticking, which can adversely affect their performance and disrupt the overall system operation. In this article, we will discuss how to effectively perform maintenance on a control valve that is stuck in the field.
Understanding Control Valves
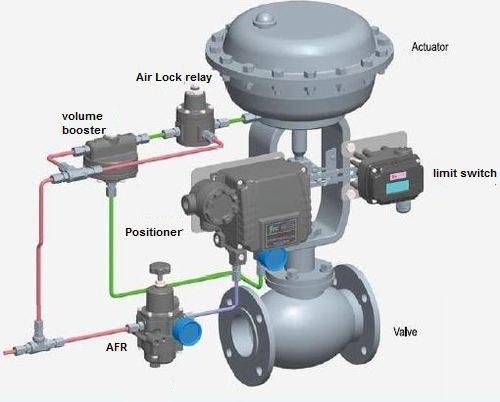
Control valves are used to control the flow rate, pressure, and temperature of fluids or gases in a process system. They typically consist of a valve body, an actuator, and a valve trim that moves in response to the actuator’s signals. Control valves can be classified into different types based on their design, such as globe valves, ball valves, butterfly valves, and plug valves, among others.
Common Issues with Control Valves
Control valves can experience various issues due to factors such as wear and tear, corrosion, and contamination. One common problem is valve sticking, which occurs when the valve trim fails to move freely or gets lodged in a partially open or closed position. This can disrupt the normal flow of fluids or gases, leading to decreased performance, increased energy consumption, and potential damage to the valve and the surrounding equipment.
How to check Stuck Control Valve in Field ?
To check if a control valve is stuck, you can follow these steps:
- Visual Inspection: Start by visually inspecting the control valve for any obvious signs of physical damage or obstruction. Look for any visible debris, corrosion, or foreign objects that may be blocking the valve’s movement.
- Manual Operation: Attempt to manually operate the control valve using the appropriate tools, such as a wrench or handwheel. If the valve does not move or is difficult to operate, it may be stuck.
- Air or Pressure Test: If the control valve is pneumatic or hydraulic, you can perform an air or pressure test to check its functionality. Apply the appropriate pressure or air to the valve and monitor its response. If the valve does not open or close as expected, it may be stuck.
- Check Instrumentation: Verify that the control signal to the valve is correct and within the desired range. Ensure that the control signal is reaching the valve actuator or positioner, and that there are no issues with the instrumentation or control system.
- Inspect Valve Positioner: If the control valve is equipped with a positioner, inspect it for any malfunctions or misalignments. Ensure that the positioner is calibrated and functioning correctly, as a faulty positioner can cause the valve to appear stuck.
- Check Actuator: Inspect the actuator of the control valve for any issues. Verify that the actuator is receiving the appropriate air or hydraulic pressure, and that it is operating correctly. A faulty actuator can cause the valve to remain stuck in a particular position.
- Consult Manufacturer’s Documentation: Refer to the manufacturer’s documentation or technical specifications for the control valve to ensure that it is being operated and maintained correctly. Follow any troubleshooting guides or procedures provided by the manufacturer.
Importance of Maintenance for Stuck Control Valves
Maintenance is essential to ensure the optimal performance and reliability of control valves. Stuck control valves can disrupt the normal operation of the process system and result in costly downtime and repairs. Therefore, it is crucial to promptly address and resolve any sticking issues to prevent further damage and ensure smooth system operation.
Required Tools
If you encounter a control valve that is stuck in the field and requires maintenance, you may need the following tools:
- Wrenches: A set of wrenches in different sizes may be needed to loosen or tighten bolts or nuts that are securing the control valve in place.
- Pipe cutter or pipe wrench: If the control valve is connected to pipes, you may need a pipe cutter or pipe wrench to disconnect the valve from the piping system.
- Lubricant: A lubricant, such as a penetrating oil or grease, can be used to loosen rust or debris that may be causing the valve to stick.
- Cleaning tools: Wire brushes or cleaning rags may be necessary to clean the valve and remove any dirt, debris, or corrosion that may be obstructing its movement.
- Spare parts: Depending on the issue with the control valve, you may need spare parts, such as gaskets, o-rings, seals, or other components, to repair or replace the damaged parts.
- Safety equipment: It’s important to prioritize safety when working on a control valve. Safety equipment such as gloves, goggles, and earplugs may be required to protect yourself from potential hazards.
Step-by-Step Guide to Maintenance of Control Valves
Control valves are crucial components in various industrial systems, ensuring smooth and accurate flow control. However, like any mechanical equipment, control valves can sometimes encounter issues such as sticking, which can disrupt the system’s performance. In this article, we will provide you with a step-by-step guide on how to perform maintenance on control valves that are stuck in the field.
1. Identifying the Issue
If a control valve is stuck, it means it is not able to move as intended or is not responding to the control signals. There are several potential issues that could be causing a control valve to become stuck:
- Mechanical obstruction: There may be physical debris, dirt, or other foreign objects that have entered the valve and are preventing it from moving freely. This could be due to poor maintenance or inadequate filtering of the fluid passing through the valve.
- Corrosion: Over time, the internal components of a control valve can corrode, resulting in increased friction and decreased mobility. This can occur when the valve is exposed to corrosive fluids, high humidity environments, or other corrosive substances.
- Wear and tear: Control valves are subjected to constant use and movement, which can lead to wear and tear on their internal components, such as the valve stem, sealing surfaces, and actuators. Over time, this wear and tear can accumulate and cause the valve to become stuck.
- Improper sizing or installation: If a control valve is not properly sized or installed, it may not function correctly, leading to issues such as excessive friction, misalignment, or improper clearance. These issues can cause the valve to become stuck or operate poorly.
- Electrical or electronic malfunction: Control valves often have electrical or electronic components, such as solenoids or positioners, that control their movement. If these components malfunction or fail, it can result in the valve becoming stuck in a certain position.
- Thermal expansion: If a control valve is subjected to extreme temperature changes, the materials may expand or contract, which can cause the valve to become stuck or difficult to move.
- Lack of lubrication: Proper lubrication is essential for the smooth operation of control valves. If the valve is not adequately lubricated, it can result in increased friction and eventually lead to the valve becoming stuck.
2. Shutting Down the System
Once the issue is identified, the next step is to shut down the system safely. It’s crucial to follow proper lockout/tagout procedures and ensure that all energy sources to the system, including electrical and pneumatic, are isolated to prevent any accidents or injuries during maintenance.
3. Inspecting the Control Valve
After shutting down the system, the control valve should be carefully inspected. This includes visually examining the valve body, actuator, and other components for any signs of damage, wear, or corrosion. The valve internals, such as the plug, seat, and stem, should also be inspected for any debris, buildup, or damage that may be causing the valve to stick.
4. Cleaning and Lubricating the Control Valve
Cleaning and lubricating the control valve is a critical step in maintaining its smooth operation. Any debris or buildup on the valve internals should be carefully removed using appropriate cleaning tools and methods. Once the valve is clean, it should be properly lubricated with a suitable lubricant, as recommended by the manufacturer, to reduce friction and improve the valve’s movement.
5. Reassembling the Control Valve
After cleaning and lubricating the control valve, it should be carefully reassembled, following the manufacturer’s instructions and specifications. All components, including the plug, seat, stem, and actuator, should be properly aligned and tightened to the specified torque. It’s crucial to ensure that all seals and gaskets are in good condition and properly installed to prevent any leaks or other issues.
6. Testing the Control Valve
Once the control valve is reassembled, it should be thoroughly tested to ensure its proper operation. This includes performing a leak test, stroke test, and performance test as per the manufacturer’s recommendations. Any issues or abnormalities should be addressed and resolved before proceeding to the next step.
7. Restarting the System
After successfully testing the control valve and resolving any issues, the system can be safely restarted. It’s essential to follow proper startup procedures and monitor the system’s performance closely to ensure that the control valve is functioning correctly and the system is operating as expected.
Tips for Preventing Control Valve Sticking Issues
- Regular maintenance: Perform regular maintenance on control valves, including cleaning, lubrication, and inspection, as per the manufacturer’s recommendations.
- Proper installation: Ensure that control valves are properly installed, aligned, and tightened, following the manufacturer’s instructions and specifications.
- Proper operating conditions: Operate control valves within their recommended operating conditions, including temperature, pressure, and flow rate, to prevent excessive wear and sticking.
- Use suitable lubricants: Always use suitable lubricants recommended by the manufacturer for lubricating control valves, and avoid using incompatible or excessive amounts of lubricants.
- Monitor system performance: Regularly monitor the system’s performance, including the control valve’s operation, and address any abnormalities or issues promptly to prevent
FAQs
How often should I perform maintenance on my control valves?
The frequency of maintenance for control valves depends on various factors, such as the type of valve, operating conditions, and manufacturer’s recommendations. Generally, control valves should undergo regular preventive maintenance, including cleaning, lubrication, and inspection, as per the manufacturer’s guidelines. This may range from monthly to yearly maintenance schedules, depending on the specific requirements of the control valve and the system it is used in.
Can I use any type of lubricant for my control valves?
No, it is important to use the lubricant recommended by the control valve manufacturer. Different control valves may require different types of lubricants based on the materials, design, and operating conditions. Using the wrong type of lubricant can cause damage to the valve and affect its performance. Always refer to the manufacturer’s instructions and specifications for the appropriate lubricant to use.
Can I perform maintenance on my control valves while the system is running?
In general, it is not recommended to perform maintenance on control valves while the system is running. Maintenance activities, such as cleaning, lubrication, and inspection, often require shutting down the system and following proper lockout/tagout procedures to ensure the safety of personnel. Working on control valves while the system is running can pose risks of injury or damage to equipment. Always follow proper procedures and guidelines for maintenance, including shutting down the system before performing any maintenance activities on control valves.
What are some signs that my control valve is stuck?
Some signs that your control valve may be stuck include reduced or erratic flow, abnormal noises or vibrations, inconsistent control of process variables, and increased pressure drop across the valve. If you notice any of these symptoms, it may indicate that the control valve is not operating smoothly and may require maintenance to resolve the sticking issue.
Can I fix a stuck control valve without shutting down the system?
In most cases, fixing a stuck control valve requires shutting down the system to ensure the safety of personnel and prevent further damage to the equipment. However, in some situations, minor sticking issues may be resolved by adjusting the actuator or manually moving the valve, without shutting down the system. It is important to follow proper procedures and guidelines for troubleshooting and maintenance, and consult with the control valve manufacturer or a qualified technician for guidance on fixing a stuck control valve without shutting down the system. Safety should always be the top priority in any maintenance activities.
Read Also
- Calculate Control Valve Stem Position
- Functional Testing of Control Valve Positioners
- Pneumatic Control Valve Positioner Principle
- Control valve sizing calculator | Cv Calculator
- Control valve Calibration | Samson control valves (model- 3730-3) Calibration
- What is Computer Programming