Systems
Instrumentation Systems
Elements of Instrumentation Systems
Type of Instruments
Performance Parameters
Static characteristics of instruments
Dynamic characteristics of instruments
This topic is an introduction to the instrumentation and measurement systems or simply “INSTRUMENTATION SYSTEM” used during changing or refining of raw materials till final product achieved in manufacturing or process industries.
Systems
A system can be defined as an arrangement of elements or a group of elements which works together to provide some form of output or final output/ product by processing the given inputs or raw materials. These systems can be mechanical, electrical or instrumentation type etc.

Instrumentation Systems
Instrumentation is the basis for process control in industry. An Instrumentation system exists to provide information about the physical value of some variable being measured. ` These Variables are called as process variable which states a condition of the process fluid (a liquid or gas) that can change the manufacturing process in some way. In simple cases, the system can consist of only a single unit that gives an output reading or signal according to the magnitude of the unknown variable applied to it. However, in more complex measurement situations, a measuring system consists of several separate elements as shown in Figure. These components might be contained within one or more boxes, and the boxes holding individual measurement elements might be either close together or physically separate. The term measuring instrument is commonly used to describe a measurement system, whether it contains only one or many elements, and this term will be widely used throughout this text.
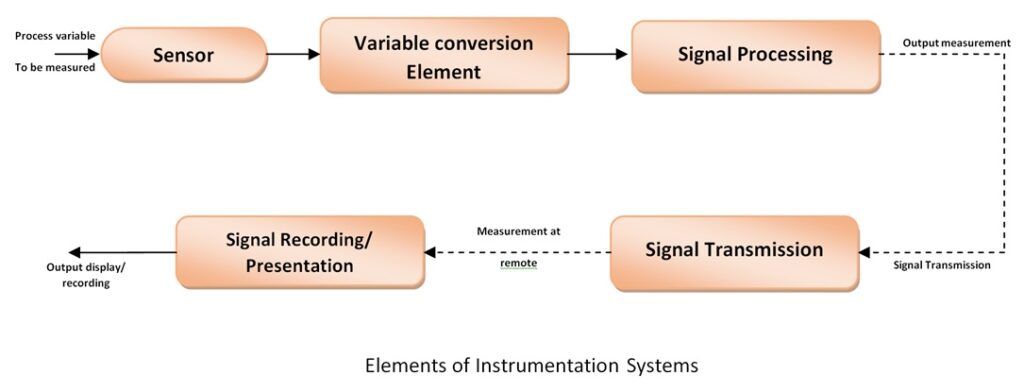


Elements of Instrumentation Systems
Sensor
The first element in any measuring system is the primary sensor:This is the element of the system which is effectively in contact with the process for which a variable is being measured and gives an output which depends in some way on the value of the variable. Some examples of primary sensors are a liquid-in-glass thermometer, a thermocouple and a strain gauge. In the case of the mercury-in-glass thermometer, the output reading is given in terms of the level of the mercury, and so this particular primary sensor is also a complete measurement system in itself. However, in general, the primary sensor is only part of a measurement system.
Variable conversion elements
These are needed where the output variable of a primary transducer is in an inconvenient form and has to be converted to a more convenient form. For instance, the displacement-measuring strain gauge has an output in the form of a varying resistance. The resistance change cannot be easily measured and so it is converted to a change in voltage by a bridge circuit, which is a typical example of a variable conversion element. In some cases, the primary sensor and variable conversion element are combined, and the combination is known as a transducer.
Signal processing elements
These exist to improve the quality of the output of a measurement system in some way. A very common type of signal processing element is the electronic amplifier, which amplifies the output of the primary transducer or variable conversion element, thus improving the sensitivity and resolution of measurement. This element of a measuring system is particularly important where the primary transducer has a low output. For example, thermocouples have a typical output of only a few milli volts. Other types of signal processing element are those that filter out induced noise and remove mean levels etc. In some devices, signal processing is incorporated into a transducer, which is then known as a transmitter.
Signal transmission
In addition to these three components just mentioned, some measurement systems have one or two other components, firstly to transmit the signal to some remote point and secondly to display or record the signal if it is not fed automatically into a feedback control system. Signal transmission is needed when the observation or application point of the output of a measurement system is some distance away from the site of the primary transducer. Sometimes, this separation is made solely for purposes of convenience, but more often it follows from the physical inaccessibility or environmental unsuitability of the site of the primary transducer for mounting the signal presentation/recording unit. The signal transmission element has traditionally consisted of single or multi-cored cable, which is often screened to minimize signal corruption by induced electrical noise. However, fibre-optic cables are being used in ever increasing numbers in modern installations, in part because of their low transmission loss and imperiousness to the effects of electrical and magnetic fields.
Signal Presentation or recording
The final optional element in a measurement system is the point where the measured signal is utilized. In some cases, this element is omitted altogether because the measurement is used as part of an automatic control scheme, and the transmitted signal is fed directly into the control system. In other cases, this element in the measurement system takes the form either of a signal presentation unit or of a signal-recording unit.
Type of Instruments
Instruments can be subdivided into separate classes according to several criteria. These sub-classifications are useful in broadly establishing several attributes of particular instruments such as accuracy, cost, and general applicability to different applications.
Active and passive instruments
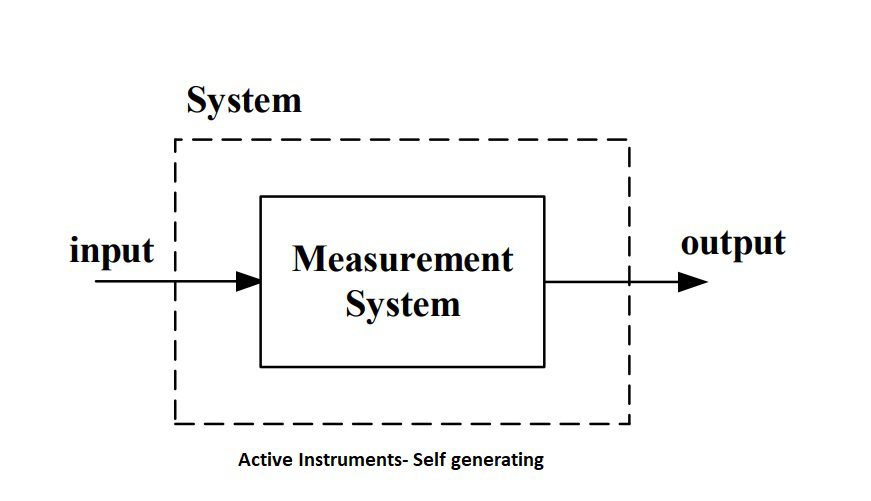
Instruments are divided into active or passive ones according to whether the instrument output is entirely produced by the quantity being measured or whether the quantity being measured simply modulates the magnitude of some external power source.In active instruments, the external power source is usually in electrical form, but in some cases, it can be other forms of energy such as a pneumatic or hydraulic one.One very important difference between active and passive instruments is the level of measurement resolution that can be obtained.In an active instrument, however, adjustment of the magnitude of the external energy input allows much greater control over measurement resolution. Whilst the scope for improving measurement resolution is much greater incidentally, it is not infinite because of limitations placed on the magnitude of the external energy input, in consideration of heating effects and for safety reasons.
Example for active instruments- Piezo-electric Crystal, Thermocouple etc.
Example for passive instruments- Potentiometer, Strain Gauge, RTD etc.


Null-type and deflection-type instruments
Null type instruments are those in which or null indication determines the magnitude of measured quantity. A null type instrument indicates a zero condition when the measured quantity and the opposite quantity are same.
Null type instrument requires many controls before null condition are obtained and hence it is not suitable for dynamic measurement because in dynamic measurement the quantity changes rapidly with the time.
The measured quantity produced some physical effects that cause a similar but opposing effect in some part of the instrument. The opposing affect increases until a balance is achieved, at which point the “deflection” is measured. Such instruments are called deflection type instruments.
Analog and digital instruments
An analog instrument gives an output that varies continuously as the quantity being measured changes. The output can have an infinite number of values within the range that the instrument is designed to measure.
A digital instrument has an output that varies in discrete steps and so can only have a finite number of values. The distinction between analog and digital instruments has become particularly important with the rapid growth in the application of microcomputers to automatic control systems. Any digital computer system, of which the microcomputer is but one example, performs its computations in digital form. An instrument whose output is in digital form is therefore particularly advantageous in such applications, as it can be interfaced directly to the control computer. Analog instruments must be interfaced to the microcomputer by an analog-to-digital (A/D) converter, which converts the analog output signal from the instrument into an equivalent digital quantity that can be read into the computer. This conversion has several disadvantages. Firstly, the A/D converter adds a significant cost to the system. Secondly, a finite time is involved in the process of converting an analog
signal to a digital quantity, and this time can be critical in the control of fast processes where the accuracy of control depends on the speed of the controlling computer. Degrading the speed of operation of the control computer by imposing a requirement for A/D conversion thus impairs the accuracy by which the process is controlled.
Indicating instruments and instruments with a signal output
The final way in which instruments can be divided is between those that merely give an audio or visual indication of the magnitude of the physical quantity measured and those that give an output in the form of a measurement signal whose magnitude is proportional to the measured quantity. The class of indicating instruments normally includes all null-type instruments and most passive ones. Indicators can also be further divided into those that have an analog output and those that have a digital display. A common analog indicator is the liquid-in-glass thermometer. Another common indicating device, which exists in both analog and digital forms, is the bathroom scale. The older mechanical form of this is an analog type of instrument that gives an output consisting of a rotating pointer moving against a scale (or sometimes a rotating scale moving against a pointer).More recent electronic forms of bathroom scale have a digital output consisting of numbers presented on an electronic display. One major drawback with indicating devices is that human intervention is required to read and record a measurement. This process is particularly prone to error in the case of analog output displays, although digital displays are not very prone to error unless the human reader is careless. Instruments that have a signal-type output are commonly used as part of automatic control systems. In other circumstances, they can also be found in measurement systems where the output measurement signal is recorded in some way for later use. This subject is covered in later chapters. Usually, the measurement signal involved is an electrical voltage, but it can take other forms in some systems such as an electrical current, an optical signal or a pneumatic signal.
Smart and non-smart instruments
The advent of the microprocessor has created a new division in instruments between those that do incorporate a microprocessor (smart) and those that don’t.Digital computers have been used in conjunction with measurement systems for many years in the typical control system scenario where a computer uses data on process variables supplied by a measurement system to compute a control signal that is then applied to an actuator in order to modify some aspect of the controlled process. In this case, the computer is not actually part of the measurement system but merely works with it by taking data from the system.However, the rapid fall in the cost of computers has led to their widespread inclusion actually within measurement systems, performing various signal processing operations digitally that were previously carried out by analog electronic circuits. In early applications of digital signal processing, the computer remained as a distinctly separate component within the measurement system. However, the past few years have seen the development of measurement systems in the form of intelligent devices in which the computational element (usually called a microcomputer or microprocessor) is much more closely integrated into the measurement system. These devices are known by various names such as intelligent instruments, smart sensors and smart transmitters.
Performance Parameters
The following are some of the more common terms used to define the performance of measurement systems and functional elements.
- Static characteristics of instruments
- Dynamic characteristics of instruments
Static characteristics of instruments
Accuracy and inaccuracy (measurement uncertainty)
The accuracy of an instrument is a measure of how close the output reading of the instrument is to the correct value. In practice, it is more usual to quote the in accuracy figure rather than the accuracy figure for an instrument. Inaccuracy is the extent to which a reading might be wrong, and is often quoted as a percentage of the full-scale(f.s.) reading of an instrument. The term measurement uncertainty is frequently used in place of inaccuracy.
Precision
Precision is a term that describes an instrument’s degree of freedom from random errors. If a large number of readings are taken of the same quantity by a high precision instrument, then the spread of readings will be very small. Precision is often, though incorrectly, confused with accuracy. High precision does not imply anything about measurement accuracy. A high precision instrument may have a low accuracy. Low accuracy measurements from a high precision instrument are normally caused by a bias in the measurements, which is removable by recalibration.
Repeatability/ Reproducibility
The terms repeatability and reproducibility mean approximately the same but are applied in different contexts as given below. Repeatability describes the closeness of output readings when the same input is applied repetitively over a short period of time, with the same measurement conditions, same instrument and observer, same location and same conditions of use maintained throughout. Reproducibility describes the closeness of output readings for the same input when there are changes in the method of measurement, observer, measuring instrument, location, conditions of use and time of measurement. Both terms thus describe the spread of output readings for the same input. This spread is referred to as repeatability if the measurement conditions are constant and as reproducibility if the measurement conditions vary.The degree of repeatability or reproducibility in measurements from an instrument is an alternative way of expressing its precision.
Tolerance
Tolerance is a term that is closely related to accuracy and defines the maximum error that is to be expected in some value. Although it is not, strictly speaking, a static characteristic of measuring instruments, it is mentioned here because the accuracy of some instruments is sometimes quoted as a tolerance figure. When used correctly,tolerance describes the maximum deviation of a manufactured component from some specified value.
Range or span
The range or span of an instrument defines the minimum and maximum values of a quantity that the instrument is designed to measure.
Linearity
It is normally desirable that the output reading of an instrument is linearly proportional to the quantity being measured.The non-linearity is then defined as the maximum deviation of any of the output readings from this straight line. Non-linearity is usually expressed as a percentage of full-scale reading.
Sensitivity of measurement
The sensitivity of measurement is a measure of the change in instrument output that occurs when the quantity being measured changes by a given amount. Thus, sensitivity is the ratio:


The sensitivity of measurement is therefore the slope of the straight line drawn on Figure-


Threshold
If the input to an instrument is gradually increased from zero, the input will have to reach a certain minimum level before the change in the instrument output reading is of a large enough magnitude to be detectable. This minimum level of input is known as the threshold of the instrument.
Resolution
When an instrument is showing a particular output reading, there is a lower limit on the magnitude of the change in the input measured quantity that produces an observable change in the instrument output. Like threshold, the resolution is sometimes specified as an absolute value and sometimes as a percentage of f.s.(Full Scale) deflection.
Sensitivity to disturbance
All calibrations and specifications of an instrument are only valid under controlled conditions of temperature, pressure etc. These standard ambient conditions are usually defined in the instrument specification. As variations occur in the ambient temperature etc., certain static instrument characteristics change, and the sensitivity to disturbance is a measure of the magnitude of this change. Such environmental changes affect instruments in two main ways, known as zero drift and sensitivity drift.
Zero drift is sometimes known by the alternative term, bias. Zero drift or bias describes the effect where the zero reading of an instrument is modified by a change in ambient conditions. This causes a constant error that exists over the full range of measurement of the instrument.
Sensitivity drift (also known as scale factor drift) defines the amount by which an instrument’s sensitivity of measurement varies as ambient conditions change. It is quantified by sensitivity drift coefficients that define how much drift there is for a unit change in each environmental parameter that the instrument characteristics are sensitive to.


Hysteresis effects
The figure illustrates the output characteristic of an instrument that exhibits hysteresis.If the input measured quantity to the instrument is steadily increased from a negative value, the output reading varies in the manner shown in curve (a). If the input variable is then steadily decreased, the output varies in the manner shown in curve (b). The non-coincidence between these loading and unloading curves is known as hysteresis. Two quantities are defined, maximum input hysteresis and maximum output hysteresis,as shown in Figure. These are normally expressed as a percentage of the full-scale input or output reading respectively.
Dead space
Dead space is defined as the range of different input values over which there is no change in output value. Any instrument that exhibits hysteresis also displays dead space, as marked on Figure. Some instruments that do not suffer from any significant hysteresis can still exhibit a dead space in their output characteristics, however.
Dynamic characteristics of instruments
The dynamic characteristics of a measuring instrument describe its behavior between the time a measured quantity changes value and the time when the instrument output attains a steady value in response. As with static characteristics, any values for dynamic characteristics quoted in instrument data sheets only apply when the instrument is used under specified environmental conditions. Outside these calibration conditions, some variation in the dynamic parameters can be expected.
In any linear, time-invariant measuring system, the following general relation can be written between input and output for time _t_ > 0:
Continue to read more… (Click Here)